The Making of a Vulnerable Machine (Blob Blog)
- bobloblaw321
- Aug 2, 2020
- 25 min read
Updated: Mar 13, 2021
This post is going to walk through my general process for how I created the TryHackMe machine Blob Blog. I won't include the exact things I included as rabbit holes/intended paths as it would be too big of a spoiler. It will, however, contain the process I went through to set up each part of the box. It will also contain some extra set up sections that did not appear on the THM machine. It will be separated into sections, for those who wish to learn the process for only aspects of the machine. For example, you may be interested in creating a box with port knocking, in which case you can skip to that section of the walk through. The layout of this post is as such:
Choosing an ISO and setting it up in VirtualBox
Network setup
Setting up users & clearing their history
Setting up SSH
Setting up FTP
Setting up web servers (both Apache & Flask)
Setting up port knocking
Setting up SMB
Incorporating CTF material
Testing & Patching unintended vulnerabilities & creating a walkthrough
Exporting to OVA in VirtualBox
I will attempt to answer any/all of the questions people may have, as I had the same questions at one point as well.
I strongly encourage you to attempt the box before reading this, as this will most likely ruin some of the box for you
This box took me about a week to make, when testing/setting up the room is included. It took about 4 days to make the initial version (and then took about 1 day when recreating it for this blog post- the message being it goes quicker the more familiar you are with it).
The short answer for how to make a box is to literally just download a VM image (ISO), and break it how you want it broken. There is nothing special to it, and I definitely didn't understand that for awhile.
You MUST test your own box, both locally and on the platform you are putting it on. The uploaded version of the box may/will change, which could break things on your machine (it did on mine). And there may be some exploits you didn't think of that your machine is vulnerable to after being "finished" (For example, my box had a kernel exploit vulnerability that I had to patch manually)
I use VirtualBox as it enables me to take snapshots with the free version (is there even a paid version?). But you can use whichever virtualization software your heart desires.
This walk through will be speaking as if you're follow the steps exactly and will not tell you how to extend to your personal box. That is for you to attempt to figure out, the base this walk through provides you should be plenty to venture forth and make you own.
The sections will, for the most part, be showing you how to set the services up, and then once it is all set up, there will be a section for adding CTF material at the end.
My final piece of advice and if anything gets across I hope it's this: TAKE SNAPSHOTS EARLY AND OFTEN!!!! You will mess up in creating this box many many many many times. There's nothing wrong with that, it's how you learn. You will get extremely frustrated, though, if you have not saved anything and must restart every time. So please, for your sake and mine, take as many snapshots as possible! As a point of reference, I took 40, yes, 40, snapshots over the course of making this machine. Too many snapshots is not a thing. Too little snapshots is, as you will learn if you don't take many. With that, have fun, I hope you learn a lot from this :)
Finding a VM Image and Setup in VirtualBox
To get started, you simply need to find an image that you wish to use. For the purpose of this tutorial I'm going to be using Ubuntu 16.04, which I got from here. A note, the actual box on THM is Ubuntu 17.04, but for these purposes there's no significant difference.
Once you find the ISO you want, download it. From the provided link I downloaded the 64-bit Server install image.
Now, in VirtualBox (my personal choice, you can adapt these steps to whatever you choose to use), create a new VM, named whatever you want, of type 'Linux' and version 'Ubuntu (64-bit)'. This will have to be changed if you're not creating a 64 bit Ubuntu machine for your box.
In the VirtualBox settings:
Click 'Machine'
Click 'Add'
You will be prompted with this:

Select the options as I have shown here and have stated above. The remaining prompts for creating the VM I left as default. You can edit those as you would like.
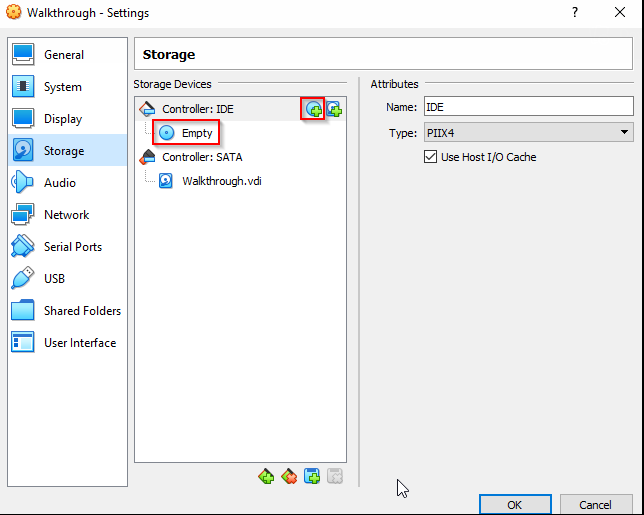
Once that VM is created and your Ubuntu ISO is downloaded, right click on the VM and click 'Settings', then 'Storage':

You should be greeted with this screen. Once you reach this point, if you do not have a disk with the label 'Empty' under the Controller field, click the upper red box in the below picture and then click 'Add':
~If you have the disk with 'Empty', skip the next 2 pictures~

And now resume following along.
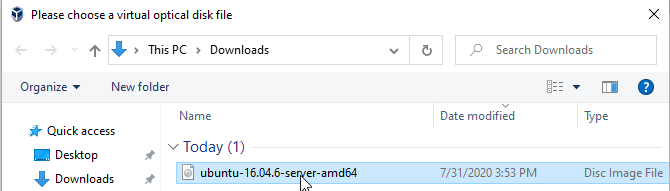
If you have the disk with the 'Empty' label, then click on it, and next to where it says 'Optical Drive', click on the disk:

You will be greeted with your file system. Chose the ISO you have downloaded.
Once the ISO is attached, either proceed to the Network Setup section or start the machine up and install.
When setting up, for the straightforward selections, I'll leave that to you.
To make the VM actually boot instead of getting caught in an infinite loop, choose:
- Yes to 'unmount partitions that are in use?'
- Guided - use entire disk and set up LVM
- Yes to 'remove existing logical volume data'
- Yes to 'Write changes to disks and configure LVM'
- Yes to 'Write changes to disk'
- Leave the proxy blank (unless you're using a proxy)
- No automatic updates
- For the software to install, choose what you need
- This isn't entirely necessary as I'll show you how to install it without this step
- Yes to 'Install Grub boot'
- Continue
Your VM should now be set up. Login and proceed to the section best suited to make your box.
Take a snapshot of the box in the base state!
Network Setup
For this section, your VM must be off.
Next, set up your network so that this machine you're creating can communicate with your attacker machine (for testing). I made this box on a different computer than my attack Kali machine is on, and so I needed both VMs to be on my home network in order for them to communicate. To do this, I put the both boxes on 'bridged adapter'. I won't explain what that is, as that could be a post in and of itself, but if you have the same set up as me, you can choose the same. Most of you will most likely have both VMs on the same machine. In this case, you can still have both machines on 'bridged adapter' if you wish. You can also put them on their own network by choosing NAT. Finally, you can create a network for them by creating a NAT Network in VirtualBox and putting them on that. I'll show you how to create a NAT Network, and then show you the option for both the bridged and NAT adapters.
Note: the VM must be turned off to make network adapter changes.
Bridged (what I use)

NOTE: These adapter names will almost assuredly be different than yours! You need to know which adapter your computer uses in order for the machine to have internet access. Some adapters will be called 'wireless' or 'wired' and will be straightforward which to choose for your VM. Others will not be, you just have to play with your options until you have internet access on the box.
2. NAT

This one is pretty straightforward.
3. NAT Network
To create a NATNetwork:
File (In VirtualBox settings)
Preferences

3. Network
4. Add new NAT Network

5. Now go back to the VM settings, network, Attached to: 'NAT Network'
6. It should default to the NAT Network you just created. If not, choose it, and you are good to go.
Now to test that the machine both has internet connectivity and internal network connectivity, we're going to try to communicate with 2 things. The first is google. A simple ping will work:

And then, I grab the IP address of my Kali machine on the same internal network and attempt to ping both to and from the newly created VM (you can do this with an `ip a` command and grab the eth0 address (although that may default to a different name, it will usually just be your #2 adapter):
Note: the .241 IP is my Kali IP address

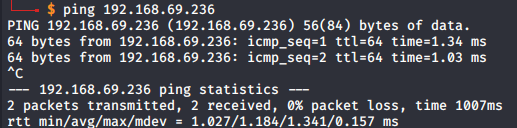
If both pings were successful back and forth, then you were successful setting up the boxes on the network.
Note: if you're setting up a Windows machine, they usually will not return pings, so you must check if they are on the same network by some other method. This isn't too much of a challenge, but I'll leave it to you.
Setting up Users
The first thing you should do when setting up your box once you have the initial networking stuff set up is your user accounts. You should give the root account an (unguessable/brute force-able) password so that you can set up the box as root.
With a fresh install of a machine, your user should have sudo privileges for everything. So the first thing we are going to do is switch users to root, and add a password so we can log in as root and only use the root account.

We do this by switching to root and adding a password:
sudo su
{enter your user's password}
passwd
{enter root password}
{re-enter root password}
Now, doing everything as root, the next thing to do is remove the user's sudo rights. By default the user is in the 'sudo' group. So to remove him we run this:
deluser {username} sudoNow that we have both user's properly set up, let's link their to null:
ln -sf /dev/null ~/.bash_historyRun this on EVERY account you set up so their bash history isn't saved.
To create a new user we can run (as root):
useradd {username}
passwd {username}
And then follow the prompts to set the new user's password. You can then set up the user's home directory like so:
mkdir /home/{username}
chown {username} /home/{username}
chgrp {username} /home/{username}
Again, with the new user, don't forget to link null to the user's bash history.
And with that you know how to set up your box's users!
Take a snapshot!!
Setting up SSH
This section will detail setting up SSH for the root account as well as one user account, and starting SSH on boot.
For this box, I set up SSH as a way to test the box remotely when something didn't work as expected. Although SSH is not necessary to test a box, something must be kept open as a way to test it remotely when you feel the box is complete.
To set up SSH for the box I followed along this article. I will also detail, step-by-step, my commands. These commands assume you're using the root account (otherwise just prepend everything with `sudo`).
apt update
apt install openssh-server
systemctl status ssh
You should then see the SSH service as `active(running)`. If not, go back and follow along the steps above or the article provided.
We must then allow SSH through the firewall with:
ufw allow sshNow you can test that your user can log in from a different machine. You should be able to successfully do so.

Again, now, for testing purposes, we also want the root account to be able to ssh in. We can follow along this article to permit this.
For a one-liner, just run this:
sed -i 's/prohibit-password/yes/' /etc/ssh/sshd_configOr you can open the file /etc/ssh/sshd_config in vim.
Once the file is open you will see this line:

Change 'prohibit-password' to 'yes'. Then write-quit the file by entering this key sequence:
escape key
:wq
enter
Restart the ssh server with:
systemctl restart sshTest that you can login as root remotely:

And we have successfully set up SSH for the users and root accounts for testing purposes!
Take a snapshot!
Setting up an FTP server
This section will be going over how I set up the FTP server owned by 'Bob'. The server did not have 'put' permissions, and did not have anonymous login. This can be easily tweaked to your desires for your own box.
This article details how to set up a user's directory for FTP access.
This article details how to disable that user's ssh access.
This article details how to enable the FTP server on system boot.
As stated previously, I'm going to be setting up the FTP server with the user 'Bob'. I will assume you have also set up this user and his home directory when proceeding. If not, please head back to the 'Setting up Users' section.
I will be assuming you are using your root account to perform these actions, if not, simply prepend each action with 'sudo'.
We have to first install VSFTPD to get set up:
apt-get update
apt-get install vsftpd
cp /etc/vsftpd.conf /etc/vsftpd.conf.orig
The article next guides you through how to update your firewall rules to allow FTP. My firewall is inactive (as should yours be), so I will skip this section. If, for some reason, your firewall is active, you can follow along the first provided article to configure it properly.
Preparing the User's Directory
We now have to set up the user's directory to be compatible with FTP rules.
The article guides you through how to create a user. Again, I will assume you have already done that, and if not, refer back to the earlier section in this blog post.
mkdir /home/bob/ftp
chown nobody:nogroup /home/bob/ftp
chmod a-w /home/bob/ftp
ls -lta /home/bob/ftp
After running these, your file system should look like this:

Now, we need to make some subfolders that will host the FTP server directory:
mkdir /home/bob/ftp/files
chown bob:bob /home/bob/ftp/files/
ls -lta /home/bob/ftp
Once again it should now look like this:

You can now add a file into that directory to test that we have access to it:
echo 'This is my test file' > /home/bob/ftp/files/test.txtConfiguring FTP access
We now only want one user, Bob, to be able to connect to FTP. We need to edit the vsftpd configuration file to set this up.
vim /etc/vsftpd.confThe article we're following along with next allows write access to FTP. I don't want this for mine, so I skip this step and instead just move on to configuring it for the user.
We do, though, need to restrict the user to accessing only the files in the FTP directory. We do this by removing the comment on the below line:

We then add these three lines to configure access for certain users:
userlist_enable=YES
userlist_file=/etc/vsftpd.userlist
userlist_deny=NO
The file should now look like this:

One other change we need to make in the file so that we don't continue to get failed login attempts, even with proper credentials, is to change this line:

Save and quit the file (:wq in vim).
We now need to add the user we want to have access to that userlist file we just gave access to:
echo 'bob' | sudo tee -a /etc/vsftpd.userlist
cat /etc/vsftpd.userlist
You should see one entry with 'bob' (or whatever your user's name is) in the file.
To make these changes take effect we now need to restart the FTP service:
systemctl restart vsftpdError Handling
At this point, my FTP was set up, but I kept getting a 500 error when trying to sign in:

We must do a few things to solve this. First, let's remove the user's SSH access (not required, but you probably don't want the user to be able to SSH in):
usermod -s /sbin/nologin bobWe then need to change the user's home directory permissions and then restart the vsftpd service:
chmod a-w /home/bob
systemctl restart vsftpd
Testing
Finally, we need to test if our changes worked:

Awesome, our FTP is now set up properly as only the intended user can get into FTP, and he cannot SSH into the machine! You can also check if your test file has been properly put onto the file system by downloading it and making sure it's not corrupted in any way.
Enabling FTP on boot
Double finally, let's enable FTP to start on boot. To do this, we enable the service:
systemctl start vsftpd
systemctl enable vsftpd
service vsftpd start
We now need to check if that worked. Turn off the VM and then turn it back on. Test out your FTP login again, and hopefully it works! If not, you may have missed a step somewhere.
Take a snapshot!
Setting up Web Servers (Apache & Flask)
Setting up an Apache Web Server
This section will detail how to set up an Apache Web Server, which, luckily, is pretty straightforward on Ubuntu. I will do my best, but to really do it justice please check out this blog post by Jake Ruston. In it, he details how to set up virtual hosts (which may appear as subdomains in CTF events).
To set up the Apache web server I followed this article.
To set up the second Apache web server (and however many you want after that, including subdomains/virtual hosts), I followed Jake's blog post as shown above.
The Flask web server will be covered after the Apache section.
I will be assuming you're the root user throughout this section. If not, just prepend your commands with 'sudo'.
Before setting up any servers, let's first enable the www-data account by editing the /etc/passwd file. Open the file for editing, and change the www-data user's line to something like this (you just need to give the user a shell):

Now on to the web server set up:
We must first update and install apache:
apt update
apt install apache2
With that, your default apache page should be set up, test it by visiting your VMs IP address, port 80, and you should see this:

Setting up a second apache web server
The somewhat tricky part comes in setting up the second Apache web server. Again, please refer to Jake's blog post to supplement this section. This first thing we need to do is copy over the first web server's configuration file to a configuration file for the second web server. We also need to make a directory to host the web server's files:
cp -r /var/www/html/ /var/www/html2/
cp /etc/apache2/sites-available/000-default.conf /etc/apache2/sites-available/site-2.conf
Once you've done this, we need to change the configuration file for the second site. Open it with vim:
vim /etc/apache2/sites-available/site-2.confAnd now, change the configuration file to chose the port to listen on, and the DocumentRoot to the second web server's root. You can choose whatever you want for these, but I will stay consistent with the names I have chosen above:
Note: That is my cursor, not an underscore following html2

This is basically what your file should look like in the end, with the changes being shown in the red squares. This is different than my actual published box, as I chose a different port, but the point remains. Save this file.
Now, to make this site active, run:
a2ensite site-2
service apache2 reload
Note: you should replace 'site-2' with the name of your second site's config file, without the '.conf'. (Do not use the path to the conf file, just use the name of the conf file, as shown above)
Now when visiting port 81 on the box's IP address, I see another default apache page. Success!
Now, to add subdirectories or files to your web server, you simply need to create the folder or file and place it in the proper directory:


And we can now see that the example page is showing as a subdirectory for our web server. I won't go any more in depth on this topic as web development is its own monster (one that I strongly dislike).
Setting up subdomains
For this, I'm just going to redirect you straight to Jake's blog, once again, and not bother covering it, as he does an awesome job in his own post.
Setting up a Flask application
This is going to be covering how to set up the Flask application hosted on my box. The first thing we need to do is install Flask:
apt install python3-pip
pip3 install flask
Now that flask is installed we can simply create a web server using their framework. The web server I created was extremely basic (I hate web servers!). You can, of course, make it more involved than mine, but this is just an example of how you can set one up.
The Flask guidance can be found here. That will guide you how to create a simple login page. I will show my code for the application itself. This link will demonstrate how to start the application on boot.
Now, to create your Flask application, we must, again, create a directory to host the application. We then need to create the app.py file, as well as a few html pages. I'll show each and explain some of the stuff that needs explaining.
App.py:
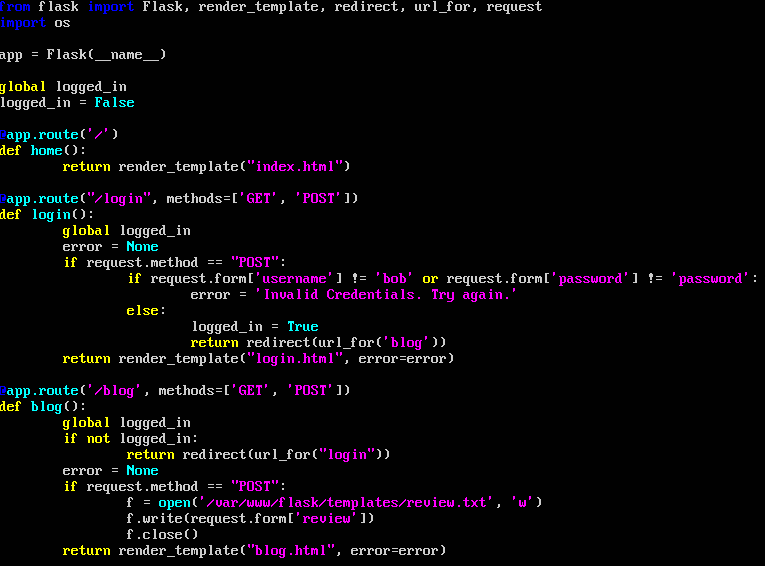

I won't explain the whole thing, as you need to somewhat need to understand code to know what's going on. The basic idea is that any page you navigate to, the app will redirect the user to the login page, unless they have successfully logged in. In order to log in it just does a string match. The important part of the app is what is allowing for the code execution. If you take a look at the 'review' function, it takes whatever is in 'review.txt' and attempts to execute it when the '/review' page is visited. If no errors are thrown, it will show the output of the command on the review page. If there are errors, it simply shows the inputted string. That is the general idea of what is needed to set up an app for RCE (remote code execution). Keep in mind that this is not blind RCE, which you can make it simply not showing the output of their command when they run it. Moving on, the blog html must send the user input in the 'review' bar to the 'app.py' file. This is done like so:

Again, I won't explain this, as teaching web site/server construction is its own course.
Finally, for the remaining files, I made a `blog1.html` that will be redirected to when the app front end is selected. I also just copied over the standard apache default page as my `index.html`.
This is what the final product looks like:

An additional few notes:
My review page was simply a txt file
For all the pages being displayed they must be moved into a subdirectory where 'app.py' is located called 'templates'. Otherwise, the app will not know where to look for the pages. The required file structure schema is illustrated wonderfully here.
At this point, you need to recursively change the ownership and group of all 3 (or more) web servers you just set up or else the user will be able to immediately gain root access on the machine. To do this, we can run:
chown -R www-data /var/www
chgrp -R www-data /var/www
ls -lta /var
From the output you should now see that the owner and group of the /var/www directory and all subdirectories is www-data.
Setting up the servers to run on boot
Luckily, the apache servers you set up, if you followed along, were already configured to run on boot, so we're all done with those! The only one we need to set up is the flask application. To do this, I followed along with this article. The first thing we need to do is, in the 'app.py' file, append to the beginning of the file:
#!/usr/bin/python3And to the end of the file:

Next, you need to edit a file:
vi /etc/init/flask.confAnd populate it with:

Finally you need to edit one last file:
vi /lib/systemd/system/flask.serviceTo make it look like this:

Once you complete this, run these commands:
chmod +x /var/www/flask/app.py
systemctl enable flask
service flask start
Now if you reboot the machine, all 3 of your web servers should be starting on boot!
Take a snapshot of your box!
Setting up Port Knocking
This section will be going over the set up for port knocking. There are many ways to do this, I found the way I did to be the easiest. For the most part, I followed this article to set this up, with some slight variations.
I will be assuming you're working as root through this section, if not just preppend 'sudo' to all commands.
IF YOU ARE SETTING THIS UP PLEASE READ THE ENTIRETY OF THIS SECTION. IT WILL NOT WORK IF YOU DON'T SET EVERYTHING UP CORRECTLY.
We first need to add a few rules to our IP tables to make some connection possible. I am keeping ports 22 and 80 open, you can choose whichever ports you want:
iptables -A INPUT -i lo -j ACCEPT
iptables -A INPUT -m conntrack --ctstate ESTABLISHED,RELATED -j ACCEPT
iptables -A INPUT -p tcp -m tcp --dport 22 -j ACCEPT
iptables -A INPUT -p tcp -m tcp --dport 80 -j ACCEPT
iptables -A INPUT -j DROP
iptables -S
That final command should give you an output like the above picture.
We now need to download IP persistence:
apt-get install iptables-persistent
service netfilter-persistent start
Next up is configuring the knockd service to allow for port knocking:
apt-get install knockd
vi /etc/knockd.conf
Change the ports and timeout in the configuration file to whatever you want. For the rule, I chose to open everything up after the correct ports were knocked. I did this because otherwise, user's wouldn't be able to transfer files from the target machine to their attacker machine. You can do as you like, I will show you how to open every port. A simple google search will point you in the correct direction to open only one, or a select number of ports, if that's what you desire instead.
To open every port after the correct sequence is knocked, my configuration file looks like so:

I chose ports 1, 3, and 5 as the sequence to open the rest of the ports up. Next, we need to enable the service by editing this:
vi /etc/default/knockdYou need to change the line to START_KNOCKD to a 1, and then uncomment the command line options, and switch it to eth0.
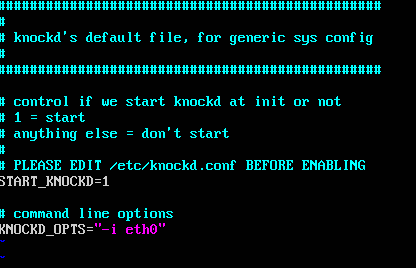
Your file should look like this after editing it.
THIS PART IS IMPORTANT!
Port knocking with knockd depends on the interface name. So wherever you are planning to upload your box you need to check what the interface name will be changed to, if it will be changed. On THM, it will be changed to 'eth0'. Therefore, I am harding-coding my interface name to 'eth0' so I can test locally with that name. To do this I followed this article.
vim /etc/default/grubChange 'GRUB_CMDLINE_LINUX="" to:
GRUB_CMDLINE_LINUX="net.ifnames=0 biosdevname=0"The final saved file should look like so:

You then need to regenerate that grub file with:
grub-mkconfig -o /boot/grub/grub.cfgWe then need to configure that interface with DHCP. To do this, edit the /etc/network/interface file to look like this:

THE PORT KNOCKING WILL NOT WORK IF YOU DON'T DO THIS.
You do not have to do this with the interface name, but if your port knocking doesn't work, it's very likely that it defaulted to a name different than what your actual interface name is.
We should be all set up now. Start the service & enable it on start up with:
systemctl enable knockd
systemctl start knockd
Now you need to restart the machine for the interface changes to take effect.
After you've restarted the machine, test it out from your attacker machine:

Success! You can use any port knocking technique you'd like, and it will still work if configured successfully.
Take a snapshot!
Setting up SMB
In this next section we are going to set up an SMB share. I did not set this up on my CTF box on THM, mostly because my using Ubuntu 17.04 made it a pain in the butt. Switching to 16.04 made it much more manageable, so I decided to show you in this writeup. I mostly followed this article to configure this part.
I will be assuming you are running as root in this section, if not, simply prepend 'sudo' to every command.
We first have to update and then install samba:
apt update
apt install samba
whereis samba
The output of the last command should show locations of samba files if successfully installed.
The next thing we need to do is create a directory for it to share:
mkdir /home/bob/sambashare/
chown bob:bob /home/bob/sambashare
vim /etc/samba/smb.conf
Append these lines to the end of the file, once opened:

Note: these settings are configurable. You can change them as you wish (for example take out the last line if you don't want anonymous login. Or change read only to 'no' if you want the user to be able to put files in the share).
After that, restart the Samba service:
service smbd restartOnce you've done that, you can check to make sure the share is now listable:

We don't have an account that allows us to access this set up yet. To set that up we can run:
smbpasswd -a bobWhere 'bob' can be replaced with the user of your choice. Set the password, and then once you have that set up, test if you can access the share:

We can (hopefully) successfully access the share both anonymously and as Bob! If you set your share up differently, your results may be different (for example if you didn't set up guest login).
Take a snapshot of your box, your samba share is all set up!
Incorporating CTF Material
Now for the fun part of boxing making: including the actual CTF material! After you have set up all the services that you planned on from following along the section above, we need to include some CTF stuff to make this an actual CTF box! The stuff I will be covering in this section:
Embedding data in images
Encrypting information
Creating a simple RE (reverse engineering) challenge
Making an SUID escalation
Making scheduled tasks (cronjobs)
Making scheduled tasks that cannot be seen by the user (root crontab)
ID RSA keys for SSH
Sudo privilege escalation
Embedding data in images
To embed data in images, the process is the exact opposite of if you were extracting the data:

As demonstrated in the picture, when you extract from the image, the same thing that was put in comes out. All that's left after embedding the information in the image is to put it somewhere on your box, like your web servers, FTP, or Samba.
Encoding/Encrypting information
Likewise for this type of information, you simply do the reverse of how you wish the information be decrypted. I like using cyber chef for this kind of stuff:

Now the process of someone decrypting this information would be for them to base64 decode and then hex decode.
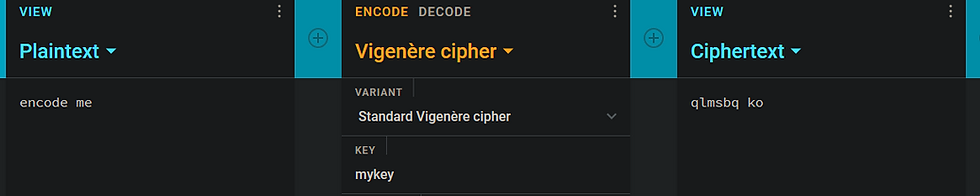
Another popular encryption/encoding method is a vigenere cipher. Likewise for this, you simply encode it with an online website with the key of your choice and then the key is needed to decode it:
Creating a simple RE challenge
For this to be simple enough, it's not entirely necessary to be able to code, but it certainly helps. I cannot code in C at all, but I am fluent in python. Knowing the terms to research helps tremendously when you know what you want your RE binary to be doing. Here is a simple C program for an example RE challenge:

The program simply checks if the environment variable 'am_i_set' is set. And as can be seen, at first, it is not, but then after I set it, it goes into the other code block and prints 'Yes'. To compile the program I ran:
gcc -o example example.cThe important part, now, of RE, is to disassemble the program yourself and see if the disassembled version is readable. I do this check with ghidra, but you can do with with any disassembler you want:

Seeing the disassembled binary in ghidra, the program is readable, so this is a suitable RE challenge. Of course, 'suitable' is an opinion, and so you can really make any binary you want be an RE challenge, you just need to know your audience.
Making an SUID Escalation
Creating an SUID escalation can either be straightforward or not. It falls under a very large umbrella. Going off the previous example of RE, I could have, instead, made the program set its UID to 0 and then spawn a shell. I would have to set the SUID bit, and then I would have an SUID escalation. Otherwise, if you don't want to create your own SUID binary, you can use this great resource gtfobins to see which binary you'd like to set the SUID bit on and the escalation will be set up for you.
To set the SUID bit, you can simply change the owner of the file and run a chmod:
chown root:root /usr/bin/myBinary
chmod u+s /usr/bin/myBinary
Making scheduled tasks
One way of scheduling tasks is using cron. To do this, we can edit the crontab to run a command however often we'd like. Below is an example of a tar wildcard exploit run through the crontab every minute. Of course, there are numerous ways to exploit a crontab, this is just an example to show how to set it up:
vi /etc/crontabOnce you have the crontab open for editing you can place whatever scheduled task you wish in there. For example, this exploitable cron wildcard job:

We can now see this cronjob as a regular user simply by inspecting the crontab file.
Making hidden scheduled tasks
Similar to making regular scheduled tasks, to make a hidden cronjob, you can simply append it to the root crontab:
crontab -eAnd then add whatever you wish to the file:

This cronjob will not be seen in the regular crontab, as it's only root accessible. To illustrate this, I've uploaded pspy64 to my machine to show you that the job is, in fact, still running:

And we have the process running as root!
ID RSA keys for SSH
To create a working key pair for SSH in a CTF, the process is the same as if you were creating a normal key pair, and you just put the private key somewhere for the users to find. To generate the key pair you can run:
su bobloblaw
ssh-keygen -t rsa
cat ~/.ssh/id_rsa.pub > ~/.ssh/authorized_keys
Switch to the user you want to create the key pair for (not really necessary, but makes it easier). Press enter through the prompts (adding a password if you want to). And then finally, add the public key to your list of authorized keys. Once this is done, you can check it worked by placing the private rsa key on your attacker machine (which I did by setting up a server and 'wget'-ing it over, changing the permissions, and attempting to login:
wget 192.168.69.233:8000/id_rsa
chmod 600 id_rsa
ssh -i id_rsa bobloblaw@192.168.69.233
If you've set everything up properly it should look like this:

Success! Some common issues people have when setting up rsa keys:
Forgetting to add the public key to the authorized_keys file
Forgetting to change the permission properly
Not putting the correct flag when attempting to SSH in
Trying to SSH in as the wrong user
If you have problems with any of these, go back to the beginning of the section and follow along each step.
All that's left is to hide this RSA key somewhere on your box, CTF style, and your SSH is all set up!
Sudo Privilege Escalation
The final privilege escalation we'll be covering is sudo. Because I don't like nano, we first need to make the sudoers file editable so we can change it in vim. We then can add lines specifying which users can execute certain commands with sudo:
These commands must be done as root, append 'sudo' if you are not using the root user.
chmod +w /etc/sudoers
vim /etc/sudoers
chmod -w /etc/sudoers
One you are editing the file in vim, add a line similar to this:

Of course, replace the command with whatever you want. Now, to test it, switch to the user you granted permission, check your sudo permissions, and make sure executing it gives the desired result:

Success!
That's all for the privilege escalation set up. MAKE SURE TO TAKE A SNAPSHOT!!
Testing & Patching Unintended Vulnerabilities
Now this is the part that becomes a bit tedious. You MUST test your box. First, run through the box on the intended you path you set up. If that works, awesome! If not, you have to fix whatever doesn't work. After the intended path works, go back and test everything you can think of! Specifically try to take some paths that you couldn't initially think of. Users will always find the path of least resistance, so if you accidentally leave an easier possible escalation path that you didn't intend, that is what everyone will use!
I won't go through the testing of my box, as it's extremely box dependent how you test yours. The biggest tips I can give:
Run every enumeration script you know of and crawl through the output
Test everything in the output that is found, and make sure nothing works except what you intend
Try all the kernel exploits known on your OS
Make sure your foothold works
Just as an example, when setting up my box, I thought I was complete, and then I began running scripts to test that only the intended path would work. The very first kernel exploit it suggested worked to escalate to root. I had to patch this manually on the box. In order to patch vulnerabilities, you can usually google the CVE/name of the exploit found and 'patch' and Google will show you how to patch it and how you can incorporate it into your box to successfully patch it. You can the patch it either as a system service or as a cron job if there are command to be run. Otherwise, you can patch it however google instructs you.
Finally, after everything is working locally and everything is patched, YOU MUST TEST IT ALL REMOTELY!! Skip ahead to the Exporting to OVA section, which immediately follows this section if you don't know how to do that, before coming back to this section for testing remotely.
For example, the second time I thought I was done with my box, I uploaded to THM, only to find the port knocking didn't work. The reason for this was AWS messes up the network interface settings when uploading an OVA. Things will not always work as intended, for one reason or another. Testing is essential for this reason. This goes for box testing as well as any software/hardware development you work on in life :)
Finally finally finally, after everything works on the remotely uploaded machine, run through it one more time on the remote platform! Except, this time, create a walkthrough of your own box! The reason for this is two-fold:
It's almost definitely going to be required wherever you're submitting your box
When creating/finishing your walkthrough you can read over it and see if the box is logical/manageable from the point of view of someone who doesn't know how to do it
That's all for this section! If you had to make change, make sure to make the changes locally and take a snapshot!!!
Exporting to OVA in VirtualBox
If you've gotten to this section, chances are you have completed making your vulnerable machine. If that's the case, congrats! Now, the final step for you to do (besides testing remotely, of course), is to export your box to OVA. I used VirtualBox so I'll show the process in VirtualBox. I don't know the process for VMware, but I'm sure it's quite similar, and this article should guide you through it for VMware. For VirtualBox the process is quite simple:
File
Export Applicance
Keep clicking next, leaving all the settings as default


Make sure you select the create VM, and then simply keep clicking next until it begins converting to OVA. Once that is complete, the final step is to upload it! Using TryHackMe as an example you can navigate to the upload tab and simply choose browse and then select the OVA you just created.

If the upload options doesn't appear for you, it's because you haven't enabled `Room Developer Options`, which I'll leave you to figure out on your own. After you have chosen your OVA to upload, it's just a waiting game! Once it's done you can begin making your room and testing the machine!
Congrats on completing your machine!
That's all for now. Please forward any feedback to B10b#9228 on Discord. Feedback is super appreciated, let me know if there is anything that isn't completely clear, anything I didn't include that you think would be useful, or any grammar/technical errors!
Thanks so much for reading!


1 Comment